Integrating BabyBuddy with Home Assistant
BabyBuddy
BabyBuddy is a self-hosted caregivers tool for tracking various activities that babies do (sleep, feedings, diaper changes, tummy time, etc). This is one of those things I never would have imagined existed until my daughter was born, but I’m glad that it does - it’s been incredibly helpful. We tracked various things when she was born, but now it’s just diaper changes and naps.
…but why?
If you’re wondering why you might want to track this kind of stuff, think of it as debug logging for babies. Until they’re able to talk, it can be difficult to sort out things like weight gain/loss, stomach trouble, etc. Not every kid needs this, but we found it really useful.
Home Assistant
BabyBuddy by itself is a great app. It’s incredibly easy and intuitive to use, especially on mobile, but it still ends up being several taps to get things done. When you’re trying to wrangle a baby, the easier things are, the better. With Home Assistant, I want to build a 1-touch interface for tracking diaper changes and get a quick-glance at how long it’s been since the last diaper change. I also want to see how much nap time she’s gotten today.
A BabyBuddy integration for Home Assistant is already available through HACS. I used this originally, but ended up dropping it when I rebuilt my Home Assistant instance earlier this year. There’s nothing wrong with the integration in particular - I’m just not a big fan of how Home Assistant integrations work. I wanted a bit more control over how (and how often) sensor data was gathered, so I’m handling this manually using NodeRed.
Authenticating
BabyBuddy has a well-documented API that’s easy to use, but first you need an API key. You can get this by clicking your username at the top-right corner of BabyBuddy and going to profile. You’ll see the API key at the bottom of the page. This just needs to be passed in the Authorization header like this:
{"Authorization": "Token abcde12345....."}
Logging Diaper Changes
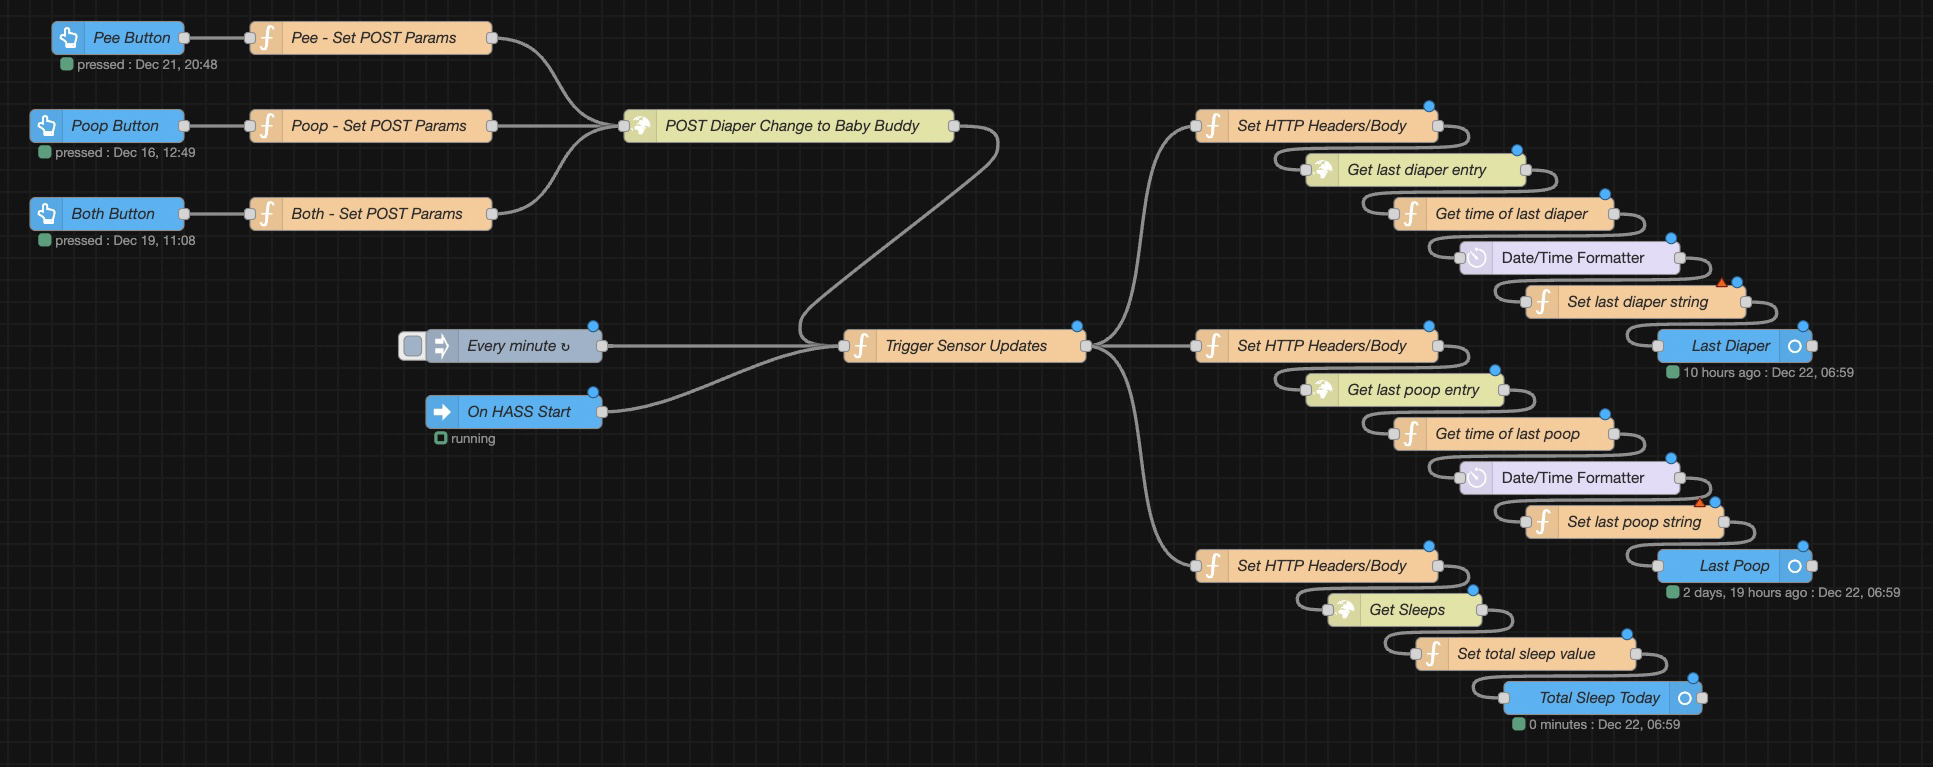
 Button Button…
To log diapers, I created 3 buttons - one for each type of diaper. I’m using the button node from the home-assistant-websocket plugin, which registers a virtual button in Home Assistant that, when pressed, will trigger the automation in NodeRed.
Each of these buttons trigger a different function that creates a payload to send to BabyBuddy depending on the type of diaper. I’m only concerned with tracking time and if the diaper was wet and/or solid. Here’s what the function looks like:
var d = new Date();

msg.payload = {
    "child": 1,
    "time": d.toISOString(),
    "wet": true,
    "solid": false,
    "color": "",
    "amount": null,
    "notes": null
}
return msg;
The output of each of these functions is piped into an http request node that’s preconfigured with the API key mentioned above and POSTed to the API at /api/changes/
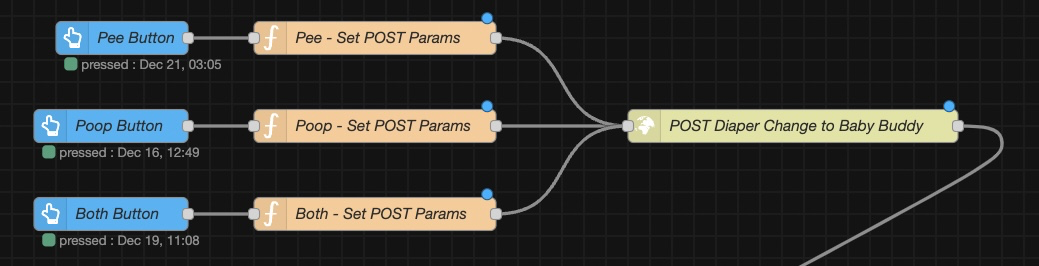
Getting the Last Diaper
 So many opportunities for potty humor with these captions…
I want to display the time since the last diaper change, and the time since the last solid diaper change. To get the last diaper, the function just sets the payload to empty:
msg.payload = {};
return msg;
Or for the last solid diaper:
msg.payload = {"solid": true};
return msg;
This gets fed into an http request node that GETs /api/changes?limit=1. This returns the most recent diaper change object that matches the query.
The “Get time of last diaper” function pulls the timestamp from the result:
msg.date = msg.payload.results[0].time
return msg;
I use the Date/Time Formatter node from the moment plugin to clean up msg.date, and pass it to the “Set last diaper string” function which creates a “time ago” string (ex: “2 hours ago”):
function msToTime(duration) {
    var milliseconds = Math.floor((duration % 1000) / 100),
        seconds = Math.floor((duration / 1000) % 60),
        minutes = Math.floor((duration / (1000 * 60)) % 60),
        hours = Math.floor((duration / (1000 * 60 * 60)) % 24);
    days = Math.floor((duration / (1000 * 60 * 60)) / 24);
    return { 'days': days, 'hours': hours, 'minutes': minutes };
}

var lastChanged = new Date(msg.payload);
var nowTime = new Date();

var delta = nowTime - lastChanged;

deltaTimeArr = msToTime(delta);
var hours = deltaTimeArr['hours']
var minutes = deltaTimeArr['minutes']

var deltaTime = "";
if (days == 1) {
    deltaTime += days + " day";
}
if (days > 1) {
    deltaTime += days + " days";
}
if (days > 0) {
    deltaTime += ", ";
}
if (hours == 1) {
    deltaTime += hours + " hour";
}
if (hours > 1) {
    deltaTime += hours + " hours";
}
if (hours > 0 || days > 0) {
    deltaTime += " ago"
}
if (hours == 0 && days == 0) {
    deltaTime += minutes + " minutes ago";
}

msg.payload = deltaTime;

return msg;
Finally, I push this value into a sensor node, which can be displayed on a Home Assistant dashboard.
Getting the Last Nap
 I wouldn’t want to sleep on an opportunity for another bad pun
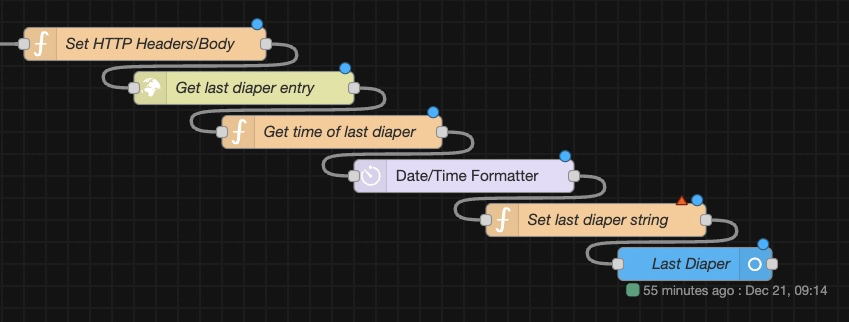
We use the BabyBuddy app itself to record the naps, but I still want to display today’s total nap time on a dashboard. The process for this is slightly different.
I send a GET request to /api/sleep?limit=10 with an empty body. The limit of 10 is arbitrary - sleep objects are returned in chronological order starting with the most recent. I just need to make sure all naps from today are returned. The total time from any naps today are calculated in the “Set total sleep value” function node:
function getSleepMinutes(sleepString) {
    var sleepStringArray = sleepString.split(":");
    var totalMinutes = Number(sleepStringArray[0]) * 60 + Number(sleepStringArray[1]);
    return totalMinutes;
}

function getSleepString(totalMinutesSlept) {
    var sleepHours = Math.floor(totalMinutesSlept / 60);
    var sleepMinutes = totalMinutesSlept % 60;
    var sleepString = '';
    if (sleepHours == 0) {
        sleepString = String(sleepMinutes) + ' minutes';
    }
    else {
        sleepString = String(sleepHours) + ' hours, ' + String(sleepMinutes) + ' minutes';
    }
    return sleepString;
}

var date = new Date();
var y = Number(date.getFullYear());
var m = Number(date.getMonth()) + 1;
var mpad = ('00' + m).slice(-2);
var d = Number(date.getDate());
var dpad = ('00' + d).slice(-2);

var targetDate = y + '-' + mpad + '-' + dpad

var totalMinutesSlept = 0;

for (let i = 0; i < msg.payload.results.length; i++) {
    if (msg.payload.results[i].start.substring(0, 10) == targetDate) {
        totalMinutesSlept += getSleepMinutes(msg.payload.results[i].duration);
    }
}

msg.payload = getSleepString(totalMinutesSlept);

return msg;
Tying it Together
 I’m sure this is what NodeRed’s developers imagined their tool would be used for…
I put an empty function node in front of these 3 sensor updaters as a single trigger to execute all of them at the same time. To keep them updated, an inject node activates the trigger every minute. The trigger is also activated whenever a diaper change is logged (this ensures that the dashboard reflects a new diaper change immediately).
I noticed that when I would restart Home Assistant, these sensors weren’t being loaded to their last state. To force them to load as soon as Home Assistant starts, I also added an events: all node which listens for the homeassistant_started event type.
Dashboard
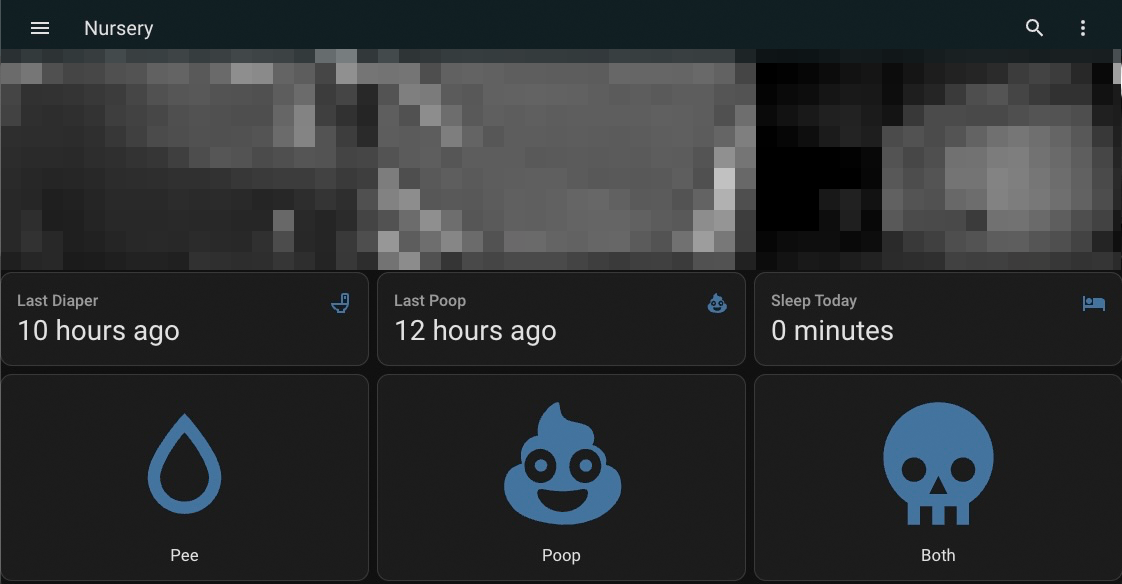 There was no MDI icon for ‘wet turd’, so a skull will have to do
I put all of this together on a pretty basic Home Assistant dashboard, which is running on an old Fire tablet sitting on the changing table. Over time, we’ve needed this less and less, but it’s been so intuitive and simple that we’ve kept using it out of habit. (And my daughter likes hitting the buttons)
You could argue that this is a bit overkill, and I would agree - but it was really useful and a lot of fun to build. What I’ve described here is much more refined than my original version, but this was the first project that I really dove into Home Assistant with. It’s been fun to work on it, and I’m please with how it turned out.