The Blog Has Landed (here’s how)
I wanted to use Hugo to create this blog, store it on a local Gitea server, and use Drone to deploy it to an nginx container on a VPS node. Here’s how I did it:
Hugo
Hugo is a static site generator that lets you create a site by writing in simple markdown - It handles the rest. Having used other feature-heavy CMS/blogging platforms in the past for other projects, the simplicity of committing a markdown doc to a git repo was really appealing to me for this blog.
Infra
I’m running Gitea and Drone containers behind Traefik on my home server, and deploying the Hugo site to an nginx container behind Traefik on my VPS node. Everything is defined with docker-compose.
Files are pushed to the Gitea repo, Drone picks up those commits, builds the Hugo site, and copies the resulting files to the nginx container on the VPS via rsync
Prereqs
- A Hugo site. This isn’t a tutorial on building a Hugo site - there are many great tutorials on that already. I’m assuming you already have a site that works on the built-in Hugo server and you want to deploy it.
- A server to run all of this on. I’m running most of the services on my local server and deploying the Hugo site to a VPS node, but it can all be done on a single host if you want.
- DNS and SSL for a domain/s that you want your Hugo site to live at. I’m using Cloudflare.
All of my infra is defined in Ansible playbooks, which is what you’ll see below. {{ variables }} should be replaced with whatever makes sense for your setup. For some context:
{{ domain_int }} = my internal LAN domain (example.com)
{{ domain_blog }} = burritovoid.net
{{ puid }}/{{ pgid }} = The user/group id of whichever user you want the service to be run as. (See Understanding PUID and PGID - LSIO)
Traefik (Home Server)
I just switched to using Traefik recently, and I’ve liked it so far. Once you get your head wrapped around it, it’s quick and easy to use. It’s configured to integrate with other docker containers via the docker socket. This config uses Cloudflare for DNS and to validate LetsEncrypt cert generation. Check the Traefik docs for more on that. Here’s what my docker-compose container definition looks like:
networks:
  proxy:
    external: false

services:
  traefik-internal:
    image: "traefik:v2.5"
    container_name: "traefik-internal"
    networks:
      - proxy
    ports:
      - "80:80"
      - "443:443"
    volumes:
      - {{ appdata_path }}/traefik-internal:/etc/traefik
      - /var/run/docker.sock:/var/run/docker.sock:ro
    environment:
      - CF_API_EMAIL={{ cloudflare_api_email }}
      - CF_API_KEY={{ cloudflare_api_key }}
    labels:
      - "traefik.enable=true"
      - "traefik.http.routers.traefik-secure.entrypoints=websecure"
      - "traefik.http.routers.traefik-secure.rule=Host(`traefik.{{ domain_int }}`)"
      - "traefik.http.routers.traefik-secure.tls=true"
      - "traefik.http.routers.traefik-secure.tls.certresolver=cloudflare"
      - "traefik.http.routers.traefik-secure.tls.domains[0].main={{ domain_int }}"
      - "traefik.http.routers.traefik-secure.tls.domains[0].sans=*.{{ domain_int }}"
      - "traefik.http.routers.traefik-secure.service=api@internal"
    restart: unless-stopped
Gitea (Home Server)
The code needs to live somewhere. Setting up the Gitea server is pretty straightforward. (I opted for an external MariaDB instance, which isn’t necessary). This is the container definition for mine:
  gitea:
	container_name: gitea
	image: gitea/gitea:1.16.8
	depends_on:
	  - gitea_mariadb
	environment:
	  - USER_UID={{ puid }}
	  - USER_GID={{ pgid }}
	  - TZ={{ tz }}
	  - GITEA__database__DB_TYPE=mysql
	  - GITEA__database__HOST=gitea_mariadb:3306
	  - GITEA__database__NAME=gitea
	  - GITEA__database__USER=gitea
	  - GITEA__database__PASSWD=gitea
	  - GITEA__repository__DEFAULT_BRANCH=main
	  - GITEA__webhook__ALLOWED_HOST_LIST=drone.{{ domain_int }}
	  - ROOT_URL=https://git.{{ domain_int }}
	  - SSH_DOMAIN=git.{{ domain_int }}
	  - APP_NAME=git.{{ domain_int }}
	  - DISABLE_REGISTRATION=true
	  - REQUIRE_SIGNIN_VIEW=true
	restart: unless-stopped
	volumes:
	  - {{ appdata_path }}/gitea:/data
	ports:
	  - 222:22
	networks:
	  - proxy
	labels:
	  - traefik.enable=true
	  - traefik.http.routers.git.entrypoints=websecure
	  - traefik.http.routers.git.rule=Host(`git.{{ domain_int }}`)
	  - traefik.http.services.git.loadbalancer.server.port=3000
	  - traefik.http.routers.git.tls=true
	  - traefik.tcp.routers.git.rule=HostSNI(`*`)
	  - traefik.tcp.routers.git.entrypoints=ssh
	  - traefik.tcp.routers.git.service=git
	  - traefik.tcp.services.git.loadbalancer.server.port=222

  gitea_mariadb:
    image: linuxserver/mariadb:version-10.5.12-r0
    container_name: gitea_mariadb
    environment:
      - PUID={{ puid }}
      - PGID={{ pgid }}
      - TZ={{ tz }}
      - MYSQL_ROOT_PASSWORD=gitea
      - MYSQL_USER=gitea
      - MYSQL_PASSWORD=gitea
      - MYSQL_DATABASE=gitea
    volumes:
      - {{ appdata_path }}/gitea_mariadb:/config
    restart: unless-stopped
    networks:
      - proxy
Make sure the GITEA__webhook__ALLOWED_HOST_LIST variable is set to the domain that the Drone service will live at. This is what Gitea uses to allow the integration - it won’t work otherwise.
At this point, create a repo for your Hugo site and push it to the repo.
Drone CI (Home Server)
Drone is a tool that can automatically build and deploy software from a repository according to predefined rules. In this case, I have it configured to watch my Gitea repo for new commits. To actually build the site, Drone is going to spin up it’s own temporary docker container which requires a runner container to be defined.
Here’s the container definition for that:
	drone:
		image: drone/drone:latest
		container_name: drone
		depends_on:
		  - drone-runner-docker
		volumes:
		  - {{ appdata_path }}/drone:/data
		networks:
		  - proxy
		labels:
		  - traefik.enable=true
		  - traefik.http.routers.drone.entrypoints=websecure
		  - traefik.http.routers.drone.rule=Host(`drone.{{ domain_int }}`)
		  - traefik.http.routers.drone.tls=true
		environment:
		  - DRONE_GITEA_SERVER=https://git.{{ domain_int }}/
		  - DRONE_GIT_ALWAYS_AUTH=true
		  - DRONE_GITEA_CLIENT_ID={{ drone_gitea_client_id }}
		  - DRONE_GITEA_CLIENT_SECRET={{ drone_gitea_client_secret }}
		  - DRONE_SERVER_HOST=drone.{{ domain_int }}
		  - DRONE_SERVER_PROTO=https
		  - DRONE_RPC_SECRET={{ drone_rpc_secret }}
		  - DRONE_USER_CREATE=username:{{ drone_user }},admin:true
		restart: unless-stopped

  	drone-runner-docker:
		image: drone/drone-runner-docker:1
		container_name: drone-runner-docker
		networks:
		  - proxy
		volumes:
		  - /var/run/docker.sock:/var/run/docker.sock
		environment:
		  - DRONE_RPC_PROTO=https
		  - DRONE_RPC_HOST=drone.{{ domain_int }}
		  - DRONE_RPC_SECRET={{ drone_rpc_secret }}
		  - DRONE_RUNNER_CAPACITY=2
		  - DRONE_RUNNER_NAME=runner
		restart: unless-stopped
DRONE_GITEA_CLIENT_ID and DRONE_GITEA_CLIENT_SECRET need to be generated from the Gitea repository where Hugo will live. See the Drone docs for how to generate these.
DRONE_RPC_SECRET is (as far as I can tell) a string you define at container creation time. It can be anything as long as both containers have the same value.
Drone setup
At this point, log into your Drone service. It should automatically prompt you to authenticate using Gitea credentials. Once you’ve authenticated, select the Hugo repo and activate it.
Traefik (VPS)
I have Traefik configured on the VPS a little different from the home server - no dashboard exposure.
networks:
  proxy:
    external: false

services:
  traefik-external:
    image: "traefik:v2.5"
    container_name: "traefik-external"
    networks:
      - proxy
    ports:
      - "80:80"
      - "443:443"
    volumes:
      - {{ appdata_path }}/traefik-external:/etc/traefik
      - /var/run/docker.sock:/var/run/docker.sock:ro
    environment:
      - CF_API_EMAIL={{ cloudflare_api_email }}
      - CF_API_KEY={{ cloudflare_api_key }}
    labels:
      - "traefik.enable=true"
      - "traefik.http.routers.traefik-secure.tls.certresolver=cloudflare"
      - "traefik.http.routers.traefik-secure.tls.domains[0].main={{ domain_blog }}"
      - "traefik.http.routers.traefik-secure.tls.domains[0].sans=*.{{ domain_blog }}"
    restart: unless-stopped
Nginx (VPS)
The Hugo site will be served by a simple nginx server:
  hugo:
    image: nginx
    container_name: hugo
    labels:
      - traefik.enable=true
      - traefik.http.routers.hugo.entrypoints=websecure
      - traefik.http.routers.hugo.rule=Host(`blog.{{ domain_blog }}`)
      - traefik.http.services.hugo.loadbalancer.server.port=80
      - traefik.http.routers.hugo.tls=true
    networks:
      - proxy
    volumes:
      - {{ appdata_path }}/hugo:/usr/share/nginx/html
    restart: unless-stopped
{{ appdata_path }}/hugo is where the files generated from Hugo will eventually land.
Rsync
I’m using rsync to move the generated site files to the server. For this you’ll need
- rsync installed on the VPS
- Keypair to ssh/scp/rsync to the VPS
Additionally, make sure the user you’ve configured the keypair for has write permissions to the {{ appdata_path }}/hugo directory on the VPS.
Drone configuration
Drone is configured by with a .drone.yml file at the root of your repository. This is loaded by Drone when new commits are pushed to the repository.
This is mine:
---
kind: pipeline
type: docker
name: build
steps:
  - name: build
    image: plugins/hugo
    settings:
      validate: true
      url: https://blog.burritovoid.net
      theme: hello-friend
      output: /site/
    volumes:
      - name: site
        path: /site

  - name: deploy
    image: drillster/drone-rsync
    settings:
      hosts: [ "burritovoid.net" ]
      target: /opt/appdata/hugo
      source: /site/*
      recursive: true
      user: drone
      key:
        from_secret: ssh-key
    volumes:
      - name: site
        path: /site

volumes:
  - name: site
    host:
      path: /opt/appdata/hugo
I’ve defined 2 steps - build and deploy - which happen in different docker containers.
The build step uses the Hugo plugin container by cbrgm. Drone handles the repo cloning automatically and passes the resulting repository to this container, which will automatically build the Hugo site and output the result to the specified path (/site/).
I’m using a named volume to store the resulting output between build and deploy steps.
The deploy step is using the rsync plugin container by drillster. This is configured with source/dest and credential info for the rsync job.
A note about paths
I use /opt/appdata as my appdata path on both servers. The named volume at the bottom of the config specifies the appdata path on the home server (where Drone is running). The target defined in the deploy step specifies the path on the VPS server. These don’t have to be the same, they just are in my case.
Drone Secrets
Drone has a secrets management feature which lets you store sensitive info (like your private key) outside of the config. The Drone docs cover how to do this, but I’ll reiterate this because it’s important:
Make sure the “Allow Pull Request” is NOT selected, especially if your git repo is publicly exposed. Checking this box would allow the secret to be used during a pull request, and thus exposed to whoever submits the request.
I’ve named mine ssh-key and referenced it in the deploy step of the drone config.
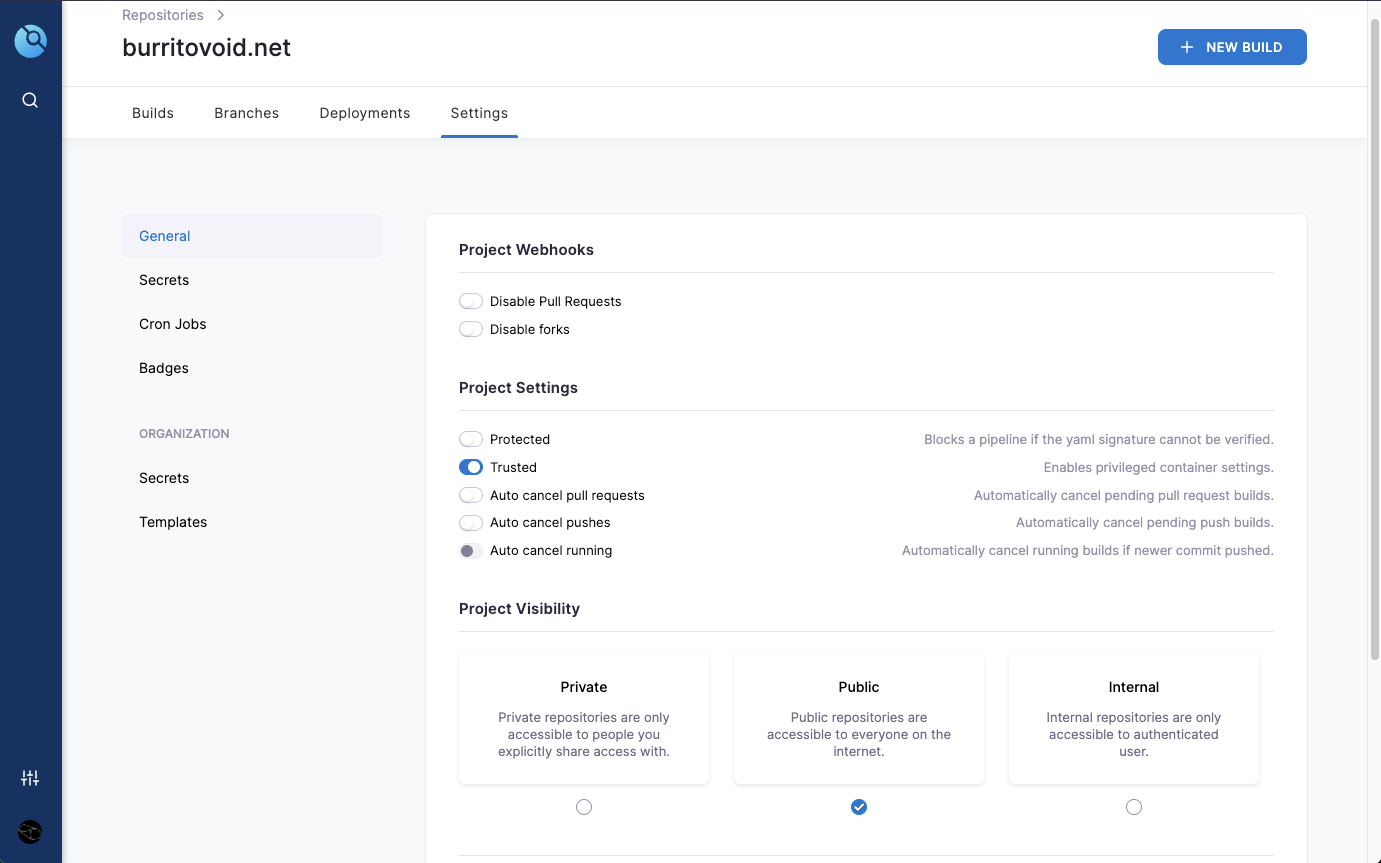
Trusted Project
Because this build pipeline needs access to volumes mounted on the host, the project needs to be specified as trusted. This can be done in the settings tab of the project in Drone:
Putting it all together
At this point, the next push to the Gitea repo should trigger a build and deploy the Hugo site. Nice.
Credit due
I just did most of this for the first time, with the help of these awesome resources: